Searching for how to update backsplash in kitchen? We have an idea for you that is under $15!
I am excited to share how we changed our outdated backsplash to a french country look for pennies on the dollar. Updating your backsplash doesn't have to cost a lot of money, see how we stayed within a $15.00 budget while still getting the look we wanted!

We have DIY idea for kitchen backsplash that is probably one of the easiest and most economical kitchen backsplash hacks around. With this idea, you can have a very creative kitchen backsplash that you will not see anywhere else.
Welcome! We are so excited to have you here! We enjoy vintage finds, sharing projects, recipes, and as you can see we have been working on updating our cozy cottage with projects like our backsplash makeover! I am not too shy to share our home with you... the good, the bad, and the ugly... so pull up a seat, and enjoy your stay. We would love to see more of you here at VSG. Did you know you can follow along with us on social media, or email? Sign up, and we will come straight to your inbox when we have new posts. Thank you, we appreciate each and every one of you visiting us.
Have I told you I love our cottage? If I have not, then I want to let you know I do! We keep working at making it "our" home with our personalities reflected throughout. Sometimes I come up with a really crazy idea, and then the more I think about it I wonder if it is as crazy as I think it is, or if it is just perfect for our cottage.
If you have read along for any length of time then you know my creativity was hindered by an art teacher for way too long. If you would like to read that post, you can click on Spring Decorating Idea. I am unsure if she was having a bad day, meant what she said, or what happened that day in 1980 something, but you know what? When working with the youth, you never know how you say something could be taken to heart. Sometimes you need to be mindful with your approach because like me, they could take that one comment and let that affect them... forever... don't worry, I got my confidence back in the creativity department. I quite enjoy it now... which leads us back to my crazy idea.
There is one room in our home that I have not spent energy doing much of anything to since Mr. Vintage is dead set it will be completely remodeled. Yep, the kitchen... I have spent many hours combing the internet looking at kitchens. None really get me excited. I do not want a kitchen like everyone else. Standard boxes that store things... I want to be excited to be in my kitchen! I want it to reflect my personality... I want to wake up every morning with a smile on my face and be so excited to set foot in my kitchen that I cannot sleep at night... ok, that may be taking it a bit far. I already do not sleep enough... but I do want to be excited to spend time in my kitchen.
I want to see curves... detail... furniture... not square boxes all lined up and your standard backsplash, and standard tile on the floor... I would love to have the black and white penny tile of days gone by, but Mr. Vintage does not agree... and I know you have to compromise... but why on this one detail do we have to? LOL.
So, when I had a crazy idea for a new backsplash, I presented my idea to Mr. Vintage. He did not have much to say at first, sometimes I think he has to prepare himself for the idea and know we will more than likely move forward with it, but he has to mentally get himself ready for it... like why do I want the bathroom closet wallpapered? Click if you would like to read You will never guess what we did. He just shakes his head and asks how do you think this will get done and who is doing this project?
My response is we can do this wonderful project together. Then we start whatever project and he takes over because he does not like how I do something or I get frustrated because it is not working out the way I saw it coming together in my mind.... secretly, he is just better at doing projects than me so I tend to get frustrated early on. Shhh... do not tell him my secret!
So when I prompted him again about changing out the backsplash, he said he wanted to do it when we remodeled the kitchen. I said well, I have an "easy" way to make it different, and beautiful, and fancy pants... he rolled his eyes and kept doing what he was doing since he has found the projects are seldom easy... so then I had to step up my game and tell him I could do it for less than $15.00! That may have gotten his attention...
Here is our backsplash before:
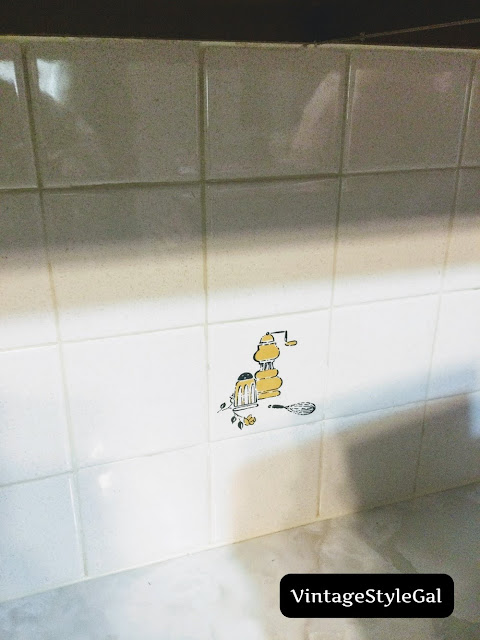
So your first question may be, hmmm.... wonder why Cara has fancy silver platters on her wall? Or you may not have thought that at all, it is just what I would wonder? I was hiding something I decided I did not want to look at anymore.
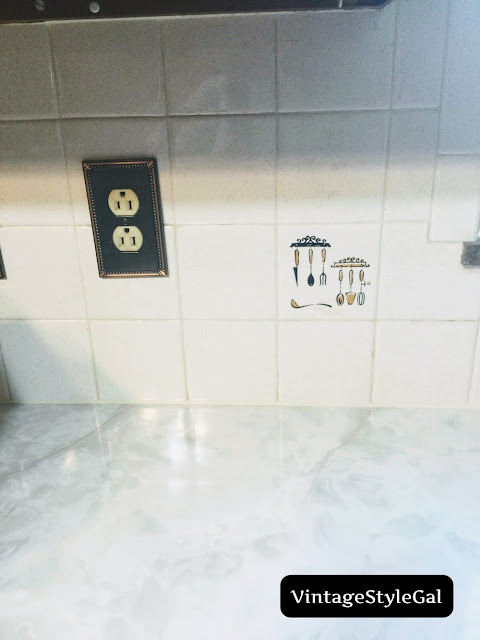
Who puts these accent tiles mixed in on the wall? I know, it was a thing they did in the 1980's (the hacked up kitchen told on itself when we peeled off the wallpaper, you can click to read Making a Home), but I am still unsure why we need to look at a pepper grinder, a whisk, a salt shaker, and a rose? Maybe that was their way of giving the cottage charm then, I am not judging, but I will just say it is not exactly my style and leave it at that. Just like when I leave this earth, the next person who owns this home says why in the world did that lady do this?
Then we have utensils, beaters, and a serving spoon...
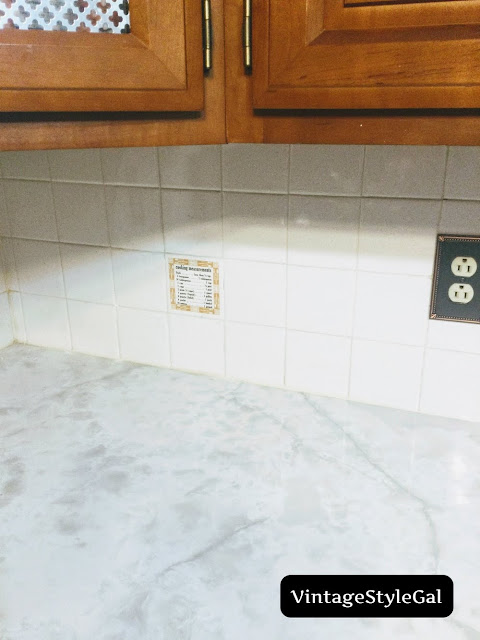
And lastly, in case you forget how to convert your measurements, it is there on the wall for your reference any old time you need it.
I could deal with the sparkles in the tile, I wasn't opposed to that. You know I like a little sparkle, but you could not see them unless you were right on top of them, but the accent tiles? I had to let them go. My silver platters kept falling down at the most inopportune times, like when we were sleeping and so peanut would bark until everyone in the house was awake, maybe our entire block. Once he focuses on something, he will not let it go.
So finally, Mr. Vintage agreed (after I purchased the materials we would need) that we could, in fact change up the backsplash! I secretly did my happy dance and smiled to myself since I was getting a new backsplash! I kept to myself that I hoped it turned out how I thought it would.
So on Saturday morning, I woke up bright and early and was ready to conquer the world! I cleaned all of the backsplash with vinegar to clean off any grease that filters through the air when you cook to prep the walls for my new backsplash, moved everything to the dining room with assistance, and started prepping our materials.
Oh, you want to skip the steps and go directly to see what the new backsplash looks like? Me too! Why bother with the hum drum details?
Love the Backsplash? Get the exact napkins I used here!
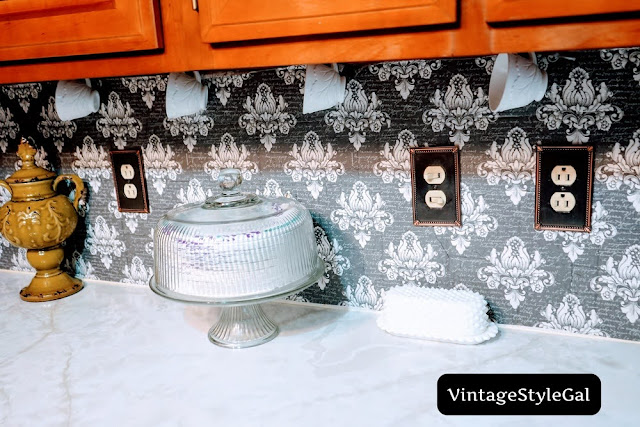
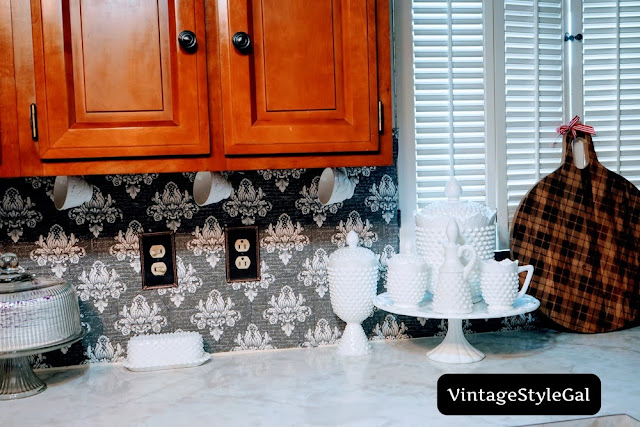
This backsplash is totally me! It’s unique, I doubt you’ll find another one like it out there... it’s gray and white... I love those two colors together... and the floral damask pattern? Why, it’s my favorite pattern of all time! You can find similar patterns in a few places in our home. I think it also complements our cherry cabinets which I’ve been dead set on painting... jury is still out on that decision for now.
I’ve wanted a white kitchen for as long as I can remember, and white kitchens are typically found in old cottages... you see I am trying to convince all of us that I NEED that white kitchen... but the backsplash? Oh, it is staying, I have already informed Mr. Vintage we will need to be extra careful when we do make changes here.
Well, now that you’ve seen the new backsplash what do you think? Are you asking yourself where is the crazy? How did they do this? Would you believe me if I told you we used a pack of decorative paper napkins and Mod Podge? No, you say? So there’s where the crazy came from? Yes, true story...
Sometimes I get ideas when I’m looking at the most mundane items in life. I was scrolling through Amazon, something I tend to do when looking for inspiration. I saw the napkins and stopped. I said to myself, oh, I do love that pattern... I want that in our home, but where and how could I do this? I didn’t stall for long, I thought hmm... kitchen... now what? I walked out to the kitchen looked around and thought. You’ve been wanting a new backsplash forever, but it never made sense to remodel that area when we were not ready for the rest of it. This seems like the ideal mini makeover! And guess what? It is staying for life! I refuse to let it go!
You see, once I am in love with something, I love it FOREVER! It is part of the reason it takes me a while to make a decision. I have to analyze it, see how it will come together in my mind, and then take the plunge in making the final decision, but in this case, I just knew it was what I wanted! Mr. Vintage suggested having custom tiles made, of course me, being me (frugal one), said why would I do that when I already have what I want?
I do have in process photos for you, I was so excited to see it come along. I never once hesitated on what if... it doesn't look right... it is a total flop... I was not letting any bad thoughts filter in... because I knew it would be perfect for what I had in mind. Sometimes you have to let caution fly out the window and just JUMP and that is what we did here.
Some may think I am crazy for basically gluing paper napkins to my wall, but you know what? I do not mind... I have always marched to the beat of a different drum... why stop now? I have never really had this issue, but there comes a point in time when you just have to live life for you and who cares what others think?
Do you see I have two different knobs on the kitchen cabinets? I was hoping you would help me decide which ones look best in our makeover? Mr. Vintage came home one evening with the mercury glass knobs for me! I was in love! I was unsure if they looked right with our cabinets though... too big? I think I am liking them with the backsplash though. I am all ears on what you think?
I should have shown a before picture of the cabinets, but do you see how shiny they are? I used Howard Feed-N-Wax on them. I have used it before on our furniture, but never on the cabinets. I was pleasantly surprised how much better they look!
I shopped our attic and I found my milk glass teacups that I decided to add to the wall. I just got the hammer out and a few nails and went to work. Mr. Vintage was not home this morning so I was on my own... not like I do not know how to use a hammer. Of course, he shook his head when he came in the backdoor and saw I had been busy. He may have mentioned something about it changing every time he leaves the house...
Milk glass is something I have collected for a while and I decided to get some pieces I have not seen in a while out. The cookie jar, sugar canister, milk and creamer set, and oil decanter were all antique store finds!
Ok, on to the in process photos...
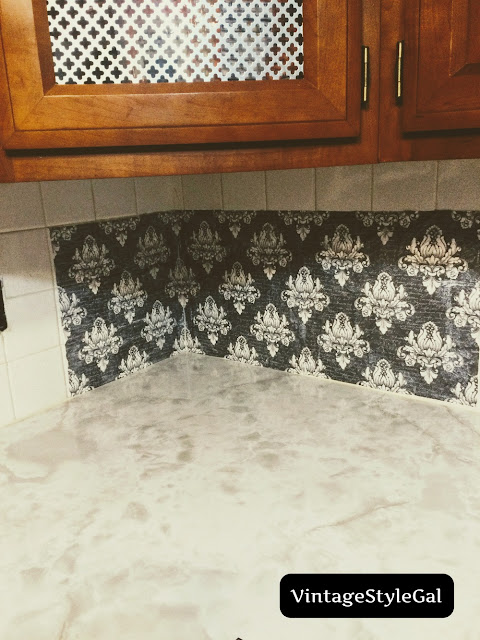
We started in the corner with the first piece, then the second piece next to it to the right. Then backtracked with the piece to the left. It all matched up perfectly.
Started putting in the second row in the corner, we wanted the hard part out of the way.

We kept installing the first row all the way to the end of the tile under the window.
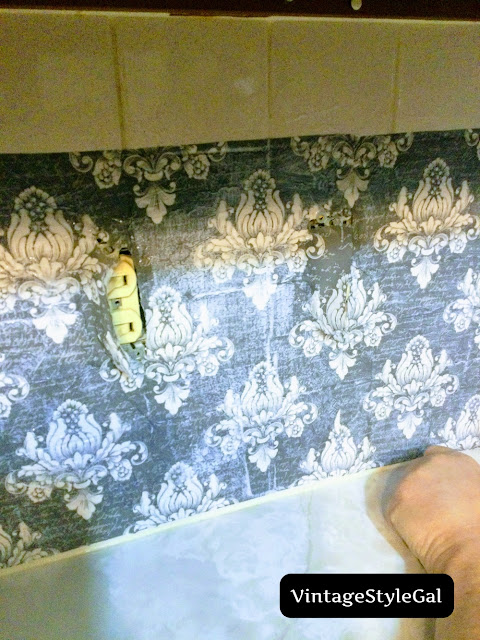
You can see where Mr. Vintage cut around the electrical sockets and light switches so we were able to keep going and matching up the paper.
One more piece left...
Questions I have received with my other decoupage projects:
Can you decoupage on ceramic tile?
The short and long answer is yes. You can add Mod Podge to ceramic tile to add pictures, paper, or napkins like we have here.
What is the best glue to use when decoupaging an item?
I have always used Mod Podge. I have never had issue with anything coming lose from any surface using this glue.
Is the surface water resistant?
Yes, we brushed on the Mod Podge over the backsplash tiles, then added another layer to the napkin after it was in place. This makes our tile water resistant.
Is Mod Podge a sealer?
Is is an all in one sealer. You can actually sand it down for a smooth surface, but I am keeping mine as is. I love the small details in the wall.
How long does it take to dry?
Mod Podge dries pretty fast, 15-20 minutes. We did make sure we had several layers to ensure this backsplash is not going anywhere.
You know, I do love your questions, keep them coming!
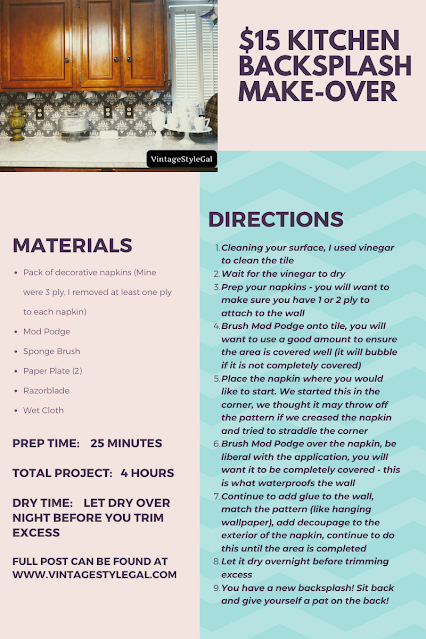
So on to the how to, it really is simple, you can find directions below on the How to Card:
So, this little backsplash is what makes me smile everyday when I walk in our kitchen. Not one morning since it has been completed have I not smiled a big dumb grin on my face when I turned on the light! The hardest thing has been keeping it quiet because I have been busy restyling the area and making my mind up where I want to store things. This gal has a lot of stuff. I need storage! Or maybe I just have too many things? On second thought, nah... I need all of this stuff! This certainly will not be the end of my crazy ideas, they come regularly, so stick around. 😉
The napkins we purchased were three-ply so when I found the guest towels, I am thinking they will work the same as the napkins we purchased. I think I would stay with a napkin that does not have a border around it if you decide to try this particular project. The potential of so many choices when seeking a backsplash just opened up, all while staying on a budget. I am beginning to feel like we may be veterans in the decoupaging arena...
disclosure: this post contains affiliate links









Amazing!!! I love it!! I'm all for simple and thrifty with a huge impact! Great job!!
ReplyDeleteThank you so much! We were so happy with the results!
DeleteI have some pretty granite tiles as my backsplash. Can I tint the modge podge and paint over the backsplash for a tinted look but still be able to see the pattern of the granite?
DeleteBeautiful. I would have never thought of using napkins and Mod Podge on a backsplash. This might be one of my future projects.
ReplyDeleteWe couldn't be happier, and now I am loving our backsplash! It was a really big change, but so happy we did it!
DeleteSince the Modge Podge waterproofs the tiled area, would this work in a shower? We are so lucky (not) to have a harvest gold colored bathtub with 4" square white ceramic tile in the entire tub surround. It is left over from 1980. I'm thinking that is I did this with a subtle print with a gold color in it, it might not look so bad. (Maybe black and gold for a Pittsburgh Steelers look). lol What do you think about the shower/tub surround?
ReplyDeleteI found my info online, they do have a dishwasher safe Mod Podge... if it would work in the dishwasher, I would think it could work in a shower too? I am unsure about that. Our backsplash does not get direct contact with water, but I have wiped it down with a wet rag and cleaning solution and have had no issue. I changed my wording on this post since I had not considered a shower wall until you mentioned it. I also saw where someone suggested you needed to varnish over the decoupaged area if it were to be in constant contact with water. The shower does not get as hot as the dishwasher, so I would think that would be the best choice for a shower surround. I would not try a bathtub since it holds so much water. We have had the tub sprayed by a professional before and I know you can change the color of your tub that way. It is about $500, but when you consider the cost of a tearing out a tub and installing a new one, it is not such a bad price. We were really happy with the way it turned out on another home.
DeleteAmazing!! Napkins!?!? Are you kidding me? Fabulous! I am pinning this right now...and sharing it on Facebook. People should know...
ReplyDeleteThank you so much! When I saw that pattern, I fell in love! I knew I had to do something with it and the backsplash seemed to be the best option.
DeleteThank you so much Amy! We were really excited it worked out so well.
ReplyDeleteWonderful idea; fabulous results. I wish I had thought of this over a decade ago. I took down my white kitchen tiles. There was grooved tile cement behind them. I was told to cover that with joint compound; that was great, but it eventually cracked. 🫣
ReplyDeleteOh no, I am sorry to hear the joint compound cracked! When I saw those napkins, I thought how can I use them in our home? The kitchen backsplash needed an update, and I did not want to spend a lot of money so I thought.... well, we can try this and see what happens? It has been over a year since we completed this project, and our backsplash is still going strong. I still love it when I walk into the kitchen every morning! Thank you for your comment!
DeleteI absolutely love this gorgeous makeover, Cara! Thank you so much for letting me share it!
ReplyDeleteOh, thank you Becky for sharing it. We were so pleased with the results on such an easy upgrade to our kitchen.
DeleteI have found THE tile that I want as my kitchen backsplash. Problem is, they're VERY costly. Could I print an image of the tile and modge podge it to the formica? Please tell me how, and everything I need to know about this process.
ReplyDeleteI apologize for the delay, I have been very sick. It would depend on what you would be printing the image on. Paper can be heavy and it will wrinkle. One ply napkin worked best for this project. I have since used Mod Podge on a variety of surfaces. When we completed this backsplash, we only cleaned the backsplash, removing any grease from the tiles. Then we applied the Mod Podge in sections to the tile, and pressed the napkins into the mod podge, then allowed it to dry. We did have some slight wrinkling, but we liked the look since we felt it appeared more vintage, and matched the look we were going for. If you have any other questions, please let me know. I do not have your name or email address to respond to you inquiry further.
Delete